Over the past 1-1.5 years, the primary focus of my work has moved from SOA/Integration towards Mobile. While I still enjoy Integration (and have been involved in integration projects for a long time), I have really been focused on application development in the Mobile Space. For this reason, I feel the need to start a new blog. In order to avoid creating a new blog in the future as my technology focus changes, I will keep the URL for this one a little more generic.
My new blog can be found at http://stevenpsmith.wordpress.com.
I will keep this blog in existence, as there are links back to some of the posts contained within it.
Wednesday, December 29, 2010
Thursday, July 16, 2009
A few beers with my Integration co-workers
Several of my co-workers and I got together last week for a few beers and a general discussion around integration projects, approaches and technologies. Fortunately (or unfortunately, depending on you perspective), the conversation was turned into a podcast and can be found here. Enjoy!!
Friday, October 3, 2008
Cloud Computing
Chariot Solutions is hosting Fall Forecast 2008 - Computing Among The Clouds this October 17th. The 2008 Fall Forecast conference highlights the emerging areas of cloud computing, software as a service and multi-core technologies. One of the appeals to cloud computing is the ability to quickly stand up a computing platform with very little investment (both cost and time). This great solution for working with SOA/Integration products because they can demand significant computing resources.
Tuesday, July 15, 2008
Creating a JMS Bridge with Spring Integration
In my last post, I discussed replacing Mule with Spring integration. While showing that to my colleague Rod Biresch, he thought it would be interesting to use Spring Integration as a JMS Bridge. He ran into an issue last year (described in his post OpenESB and Glassfish: JMS Messaging) where he needed to replace Glassfish's Messaging Broker with a remote instance of ActiveMQ. From there, he was going to use an MDB to pull the message off the queue, and then write JMS code to place the same message on another broker's (non-ActiveMQ) queue. At the time, that was certainly an acceptable way to accomplish that. Another option would have been to use Mule to bridge the queues. Today several more options exist, including Spring Integration and Camel (among others). The nice thing about these is that they integrate nicely with Spring and are very lightweight. In this post, I will show how to use Spring Integration as a JMS Bridge between ActiveMQ and JBossMQ. I am using Spring Integration 1.0M5, ActiveMQ 5.1 (standalone), and JBoss 4.2.2 GA Server. Of course, this concept can be exteneded to bridge any 2 JMS providers.
In the Spring configuration file, we need to specify a listener (JMS Gateway) to receive the message off the ActiveMQ queue and place it on a channel, a channel adapter to take the messages from the channel and send them to a target endpoint, and a target endpoint that places the messages on the JBoss queue. And, of course a message bus to coordinate everything.
Below is the Spring Integration related configuration as previously described:
Important safety tip: The ActiveMQ web console doesn't always work as it appears. When trying to place a message on the queue, do not use the "Send" link within the header area of the page. Use the "Send To" link in the operations column of the queue listing page. I wasted a little time troubleshooting what I thought was a problem :)
If you are using Maven, here is the pom I used for this application:
In the Spring configuration file, we need to specify a listener (JMS Gateway) to receive the message off the ActiveMQ queue and place it on a channel, a channel adapter to take the messages from the channel and send them to a target endpoint, and a target endpoint that places the messages on the JBoss queue. And, of course a message bus to coordinate everything.
Below is the Spring Integration related configuration as previously described:
Of course along with this we need the required connection factories defined, as shown here:
<!-- define the message bus -->
<integration:message-bus/>
<!-- necessary channels -->
<integration:channel id="bridgeChannel"/>
<!-- JMS Source that will receive messages -->
<integration:jms-gateway request-channel="bridgeChannel" connection-factory="jmsFactory" destination-name="alert.inbound.notification.queue" expect-reply="false"/>
<!-- define the channel adapter -->
<integration:channel-adapter channel="bridgeChannel" target="jmsTarget"/>
<integration:jms-target id="jmsTarget" connection-factory="jmsJBossConnFactory" destination="jBossQueue"/>
We also need a way to start up the Spring Context. If you are writing a web application, this would happen through configuration. In my circumstances, I was writing a standalone application for testing purposes, so I wrote a simple java class to load the Spring Context:
<!-- JMS connection factory for ActiveMQ -->
<bean id="jmsFactory" class="org.apache.activemq.ActiveMQConnectionFactory">
<property name="brokerURL">
<value>tcp://localhost:61616</value>
</property>
</bean>
<!-- Connection information for JBoss Queue -->
<jee:jndi-lookup jndi-name="ConnectionFactory" id="jmsJBossConnFactory" environment-ref="jndiProps" expected-type="javax.jms.ConnectionFactory"/>
<jee:jndi-lookup jndi-name="queue/A" id="jBossQueue" environment-ref="jndiProps" expected-type="javax.jms.Queue"/>
<util:properties id="jndiProps" location="classpath:jndi.properties"/>
I used the web console included with the standalone ActiveMQ distribution along with the Administration Console for JBoss to validate everything worked. You could just as easily use Hermes or something like that too.
public static void main( String[] args ) {
AbstractApplicationContext context = new ClassPathXmlApplicationContext("spring-integration-config.xml");
}
Important safety tip: The ActiveMQ web console doesn't always work as it appears. When trying to place a message on the queue, do not use the "Send" link within the header area of the page. Use the "Send To" link in the operations column of the queue listing page. I wasted a little time troubleshooting what I thought was a problem :)
If you are using Maven, here is the pom I used for this application:
And it was as simple as that. I spent more time getting the Maven dependencies figured out than anything else.
<project xmlns="http://maven.apache.org/POM/4.0.0" xmlns:xsi="http://www.w3.org/2001/XMLSchema-instance"
xsi:schemaLocation="http://maven.apache.org/POM/4.0.0 http://maven.apache.org/maven-v4_0_0.xsd">
<modelVersion>4.0.0</modelVersion>
<groupId>com.chariotsolutions.jms.adapter</groupId>
<artifactId>JMSAdapter</artifactId>
<packaging>jar</packaging>
<version>1.0-SNAPSHOT</version>
<name>JMSAdapter</name>
<url>http://maven.apache.org</url>
<repositories>
<repository>
<id>com.springsource.repository.bundles.milestone</id>
<url>http://repository.springsource.com/maven/bundles/milestone</url>
</repository>
<repository>
<id>com.springsource.repository.bundles.release</id>
<url>http://repository.springsource.com/maven/bundles/release</url>
</repository>
<repository>
<id>com.springsource.repository.bundles.external</id>
<url>http://repository.springsource.com/maven/bundles/external</url>
</repository>
</repositories>
<dependencies>
<dependency>
<groupId>org.springframework.integration</groupId>
<artifactId>org.springframework.integration</artifactId>
<version>1.0.0.M5</version>
</dependency>
<dependency>
<groupId>org.springframework.integration</groupId>
<artifactId>org.springframework.integration.adapter</artifactId>
<version>1.0.0.M5</version>
</dependency>
<dependency>
<groupId>org.apache.activemq</groupId>
<artifactId>activemq-core</artifactId>
<version>5.1.0</version>
</dependency>
<dependency>
<groupId>jboss</groupId>
<artifactId>jbossmq-client</artifactId>
<version>4.0.2</version>
</dependency>
<dependency>
<groupId>jboss</groupId>
<artifactId>jnp-client</artifactId>
<version>4.0.2</version>
</dependency>
<dependency>
<groupId>jboss</groupId>
<artifactId>jboss-common</artifactId>
<version>4.0.2</version>
</dependency>
<dependency>
<groupId>log4j</groupId>
<artifactId>log4j</artifactId>
<version>1.2.13</version>
</dependency>
<dependency>
<groupId>concurrent</groupId>
<artifactId>concurrent</artifactId>
<version>1.3.3</version>
</dependency>
<dependency>
<groupId>junit</groupId>
<artifactId>junit</artifactId>
<version>3.8.1</version>
<scope>test</scope>
</dependency>
</dependencies>
</project>
Wednesday, June 25, 2008
Trying out Spring Integration
When building our Virtual Enterprise (1-1.5 years ago), we ended up using Mule ESB (version 1.3.3 at the time) to handle protocol mediation. The intent at the time was to focus on getting our hands into various SOA product suites in more of a real world situation. Therefore, we really didn't want to spend the time to write the code required to write to or read from a JMS queue, or call a web service, or write code to communicate over whatever protocol our enterprise requires. We also wanted the ability to change the protocol over which any endpoint within the Virtual Enterprise communicated. This would allow us to mimic numerous scenarios without having to make coding changes. Mule ESB gave us these capabilities mainly through the configuration of connectors and routers on POJOs.
With the introduction of Spring Integration (currently milestone 4), I have decided to take a look back at one of the endpoints in our Virtual Enterprise and convert it from Mule to Spring Integration. The main motivation for this is to get my hands into Spring Integration and start to get a feel for the capabilities it offers. The endpoint I chose was the Emergency Alert System (EAS). This is a spring web application that runs an embedded instance of Mule for the protocol mediation mentioned above. This application communicates via message queues. When an alert is created, it sent to a JMS queue that kicks off a business process which subsequently notifies other external systems. During various points in the business process, information flows back into the EAS via other message queues.
In order to accomplish this with Mule, the following mule configuration file was required:
With the introduction of Spring Integration, we were interested in seeing if we could use this framework in the same way we were using Mule. So I went about the task of converting the embedded Mule configuration to Spring Integration. In the end, it really wasn't too difficult.
The first step in my conversion process was to send the outbound message to the alert.outbound.queue (an ActiveMQ queue). I only had to add the following JARS to my classpath: org.springframework.integration-1.0.0.M4.jar and org.springframework.integration-adapter-1.0.0.M4.jar.
In order to use spring integration to route my messages, I first defined a message bus. This is accomplished by declaring the following component in my spring configuration file:
Then in my POJO, I added setters to inject the MessageChannel (represented by the channel element in my configuration) so I could send the message to the channel.
Then the Spring Integration framework would take over from there to route the message to the alert.outbound.queue.
Next, I had to configure the inbound messages and route them to a particular method on another POJO. This was pretty straightforward as well, and was accomplished entirely through configuration. I needed to define a channel, a JMS Source, and a handler endpoint. In this case, I wanted to follow a message driven approach rather than a polling approach, so I used a JMS Gateway. Unfortunately, there is a bug when using namespace support for JMS Gateway configuration (that is already fixed, but not in milestone 4), so I had to configure it using a bean declaration. The configuration for receiving the message from the queue and routing to my POJO can be seen below:
I found using Spring Integration (in this simple example) very logical, straightforward, and lightweight. I guess these seem to be typical attributes that come to mind when using Spring.
With the introduction of Spring Integration (currently milestone 4), I have decided to take a look back at one of the endpoints in our Virtual Enterprise and convert it from Mule to Spring Integration. The main motivation for this is to get my hands into Spring Integration and start to get a feel for the capabilities it offers. The endpoint I chose was the Emergency Alert System (EAS). This is a spring web application that runs an embedded instance of Mule for the protocol mediation mentioned above. This application communicates via message queues. When an alert is created, it sent to a JMS queue that kicks off a business process which subsequently notifies other external systems. During various points in the business process, information flows back into the EAS via other message queues.
In order to accomplish this with Mule, the following mule configuration file was required:
As you can see, this configuration defines the appropriate JMS Connection information for connecting to ActiveMQ, the transformers necessary to convert to and from JMS Text Messages, and the Mule endpoints (the implementations refer to Spring beans defined in my Spring config file) with the appropriate routers defined for the inbound and outbound JMS Queues. This configuration isn't too bad. In order to embed Mule within my Spring application, I had to add 16 JARS to my classpath. Then, when the web application would start up, the embedded Mule server would start up as well, sharing the spring context, and everything connected nicely. In order to send messages to the outbound queue, I used the MuleClient class to get access to the endpoints, and let the Mule server handle the rest. The code was as simple as this:
<?xml version="1.0" encoding="UTF-8"?>
<!DOCTYPE mule-configuration PUBLIC "-//SymphonySoft //DTD mule-configuration XML V1.0//EN"
"http://www.symphonysoft.com/dtds/mule/mule-spring-configuration.dtd">
<mule-configuration id="SOA_LAB_EAS" version="1.0">
<mule-environment-properties serverUrl="tcp://localhost:60505"/>
<!-- Use this connector if using ActiveMQ as the JMS provider -->
<connector name="jmsConnector" className="org.mule.providers.jms.JmsConnector">
<properties>
<property name="specification" value="1.1"/>
<property name="connectionFactoryJndiName" value="ConnectionFactory"/>
<property name="jndiInitialFactory" value="org.apache.activemq.jndi.ActiveMQInitialContextFactory"/>
<map name="connectionFactoryProperties">
<property name="brokerURL" value="tcp://localhost:61616"/>
<property name="brokerXmlConfig" value="classpath:/activemq-config.xml"/>
</map>
</properties>
</connector>
<transformers>
<transformer name="JmsMessageToString" className="org.mule.providers.jms.transformers.JMSMessageToObject" returnClass="java.lang.String"/>
<transformer name="StringToJmsMessage" className="org.mule.providers.jms.transformers.ObjectToJMSMessage" returnClass="javax.jms.TextMessage"/>
</transformers>
<model name="EAS">
<mule-descriptor name="EASCallReceiver" implementation="conferenceCallReceiver">
<inbound-router>
<endpoint address="jms://alert.inbound.call.queue" transformers="JmsMessageToString"/>
</inbound-router>
</mule-descriptor>
<mule-descriptor name="EASNotificationReceiver" implementation="notificationInfoReceiver">
<inbound-router>
<endpoint address="jms://alert.inbound.notification.queue" transformers="JmsMessageToString"/>
</inbound-router>
</mule-descriptor>
</model>
</mule-configuration>
where outboundEndpoint is a String value injected into my class which references the URI for the JMS queue (i.e. jms://alert.outbound.queue). As for the inbound messages, they were handled by Mule based on the inbound routers configured on the Mule Endpoints. Once a message was delivered to a queue, Mule transformed it to a string (based on the defined transformers) and routed it to my POJO. Overall, we were quite pleased with this scenario.
MuleClient muleClient = new MuleClient();
muleClient.sendNoReceive(outboundEndpoint, messageBody, null);
With the introduction of Spring Integration, we were interested in seeing if we could use this framework in the same way we were using Mule. So I went about the task of converting the embedded Mule configuration to Spring Integration. In the end, it really wasn't too difficult.
The first step in my conversion process was to send the outbound message to the alert.outbound.queue (an ActiveMQ queue). I only had to add the following JARS to my classpath: org.springframework.integration-1.0.0.M4.jar and org.springframework.integration-adapter-1.0.0.M4.jar.
In order to use spring integration to route my messages, I first defined a message bus. This is accomplished by declaring the following component in my spring configuration file:
Next, I needed to define a channel, and connect that channel to a target endpoint. This is accomplished with the following configuration:
<integration:message-bus/>
Since we are targeting a JMS endpoint, the target attribute refers to a JMS target bean configured like this:
<integration:channel id="outboundAlertChannel"/>
<integration:target-endpoint input-channel="outboundAlertChannel" target="jmsTarget"/>
This uses an ActiveMQ connection factory and defines the queue destination on which to place the outbound message.
<integration:jms-target id="jmsTarget" connection-factory="jmsFactory" destination-name="alert.outbound.queue"/>
Then in my POJO, I added setters to inject the MessageChannel (represented by the channel element in my configuration) so I could send the message to the channel.
outboundAlertChannel.send(new StringMessage(messageBody));
Then the Spring Integration framework would take over from there to route the message to the alert.outbound.queue.
Next, I had to configure the inbound messages and route them to a particular method on another POJO. This was pretty straightforward as well, and was accomplished entirely through configuration. I needed to define a channel, a JMS Source, and a handler endpoint. In this case, I wanted to follow a message driven approach rather than a polling approach, so I used a JMS Gateway. Unfortunately, there is a bug when using namespace support for JMS Gateway configuration (that is already fixed, but not in milestone 4), so I had to configure it using a bean declaration. The configuration for receiving the message from the queue and routing to my POJO can be seen below:
The jmsGateway connects the queue to the channel and the handler-endpoint connects the channel to my POJO, specifying the method to call on the POJO. The message is converted by the framework from a JMS Text message to a String. That was it, no coding changes required for this modification.
<integration:channel id="inboundAlertNotificationChannel"/>
<bean id="jmsGateWay" class="org.springframework.integration.adapter.jms.JmsGateway" init-method="start"
destroy-method="destroy">
<property name="connectionFactory" ref="jmsFactory"/>
<property name="requestChannel" ref="inboundAlertNotificationChannel"/>
<property name="destinationName" value="alert.inbound.notification.queue"/>
<property name="expectReply" value="false"/>
</bean>
<integration:handler-endpoint input-channel="inboundAlertNotificationChannel" handler="notificationInfoReceiver" method="receiveNotificationInfo"/>
I found using Spring Integration (in this simple example) very logical, straightforward, and lightweight. I guess these seem to be typical attributes that come to mind when using Spring.
Tuesday, May 27, 2008
Testing Web Services with SoapUI
Over the past year I have been working on several projects that have kept me quite busy. Therefore, it has been a while since I've posted anything to my blog. But during some recent discussions with co-workers, I realized that a post regarding how we used SoapUI as a functional testing framework would be of value to service developers and architects. And that's what this post is going to describe. It is not intended to be a discussion on the pros and cons of testing web services using SoapUI versus JUnit versus other testing frameworks. It is simply a discussion of how we used SoapUI's Test Suite capabilities to validate that our service was meeting its requirements and functioning correctly after deployments.
The Service and How Should We Test It?
The service that we were developing was one needed for basic authentication and user profile management. The data was stored in an Oracle database and there were requirements supplied from the business regarding data validation rules and business logic. Very standard stuff. Once the WSDL and database designs were completed, we discussed the best way to test our service once implementation began. We started developing test cases with JUnit and subsequently testing our deployments with SoapUI. After a very short period of time (and a better understanding of the capabilities of SoapUI), we realized that we were starting to duplicate our testing logic between the two frameworks. After some more consideration, it became apparent that through the creation of SoapUI Test Cases and Test Suites, we could perform the same level of testing as we could writing JUnit tests. The additional benefit that we got by using SoapUI was that we could validate deployments in various environments very quickly and easily. This allowed us to confidently notify service consumers that deployments were available and ready for consumption.
System Requirements
The requirements for using SoapUI for testing this kind of service are quite simple. First, you need SoapUI (obviously). For our needs, the open source version was more than capable. You need a service to test. Our service was deployed to Weblogic, and I have it running locally. If you intend for your Test Suite to clean the database up after your test run completes, you will need the appropriate JDBC driver. The driver needs to be placed in the <soapui-home>/bin/ext directory. That's it. At this point, I am assuming you have a SoapUI project set up for your service. If not, it is pretty straightforward to create a project off of a WSDL.
Test Suite Overview
Our service was comprised of about 20 different service operations, some of which write to the database, and all of them read from the database. A test case was developed for each service operation, and the test steps within each test case were developed based off the requirements of the operation. Since the purpose of the service is User Profile management, we needed to define a number of attributes that could be reused across the test cases for testing and assertions. For example, our service has one operation for registering a user and another for getting a users profile data. So the data used for the registration test cases can be used subsequently to validate the return from the get user operation. Also, at the end of the test run, we want to clean up any data that was created and used for the test, so we needed to keep track of users created, etc.
So, the next few sections will describe how to go about creating the Test Suite, defining and using Properties, and provide examples of different Test Steps and how they were developed.
Creating the Test Suite
There are two ways to create a new Test Suite within SoapUI. The first is to right click on the service interface in the left hand pane of the application and select "Generate TestSuite" as shown below:
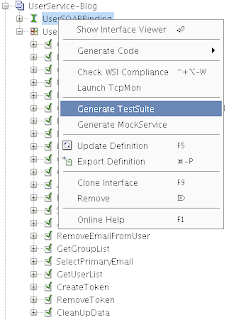
You will be prompted to select the operations to include in the Test Suite, along with some options for how you want the Test Suite constructed. Using "One TestCase for each Operation" provides a good modular approach to developing your Test Suite, and it also makes reuse and Load Tests easier. If you have been using SoapUI to exercise the web service and have existing requests defined in the Service Interface, you can choose to reuse those requests or you can have SoapUI generate empty requests.
An alternative way to create a Test Suite would be to right-click on the project and select "New TestSuite". You will be prompted for a name and an empty Test Suite will be created. Test Cases can be added by right-clicking on the TestSuite and selecting "New TestCase".
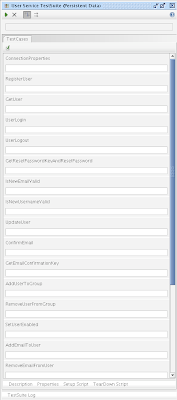
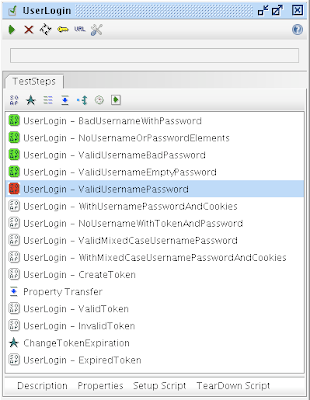
Then within each Test Case, you can define one or more Test Steps. These represent the actual test code that gets executed. Shown below is a screen shot of the RegisterUser Test Case.
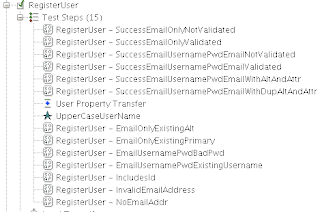 As you can see, there are 15 test steps. These map to the requirements that we were implementing against. They are executed in the order shown, and their order can be changed by right-clicking on a Test Step and selecting either Move Up or Move Down.
SoapUI supports numerous types of test steps including: SOAP, Groovy, Property Transfer, Property Steps, Conditional Gotos, and Delays. In our project we used SOAP steps, Property Transfer steps and Groovy Script steps. More details on the various Test Steps we used and how we used them can be found later in this post.
Defining Test Properties
As mentioned earlier, we need to define a number of properties that can be reused across test cases and assertions. These properties are defined at the Test Suite level.
Once we have a Test Suite, we can define properties that can be shared and reused across Test Cases within the Test Suite. If you open the Test Suite editor by double-clicking on the Test Suite in the left hand pane, you will see the following:
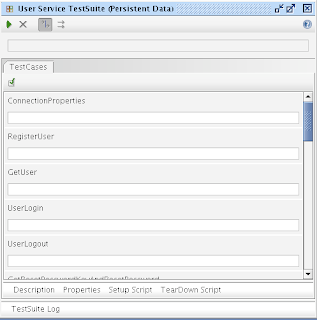
By clicking on the "Properties" button on the bottom of the window, you can define Test Suite properties. Below is an example of some of the properties we defined:
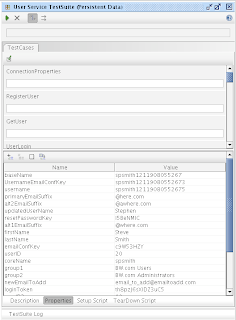
At the top of the Properties window, there is a button that lets you add or remove property name/value pairs. Here you can also import property values from a file. Our approach was to define all the properties we needed ahead of time (or at least as much as we knew about), and access or set their values as needed throughout the test cases.
This approach worked pretty well, except that we realized that if developers were executing the test suite concurrently we could have data collisions. Especially with attributes like username and email address, which are unique across the system. So we needed a way to provide some level of uniqueness during the life of a test execution. We did this via the "Setup Script" option for the Test Suite. SoapUI will execute the Setup Script upon each Test Suite execution. It will also execute the TearDown Script upon completion of the test run.These Setup and Teardown scripts are Groovy based scripts . So, we wrote a little script to append the current time in millis onto some property (called "coreName") and placed that in the SetupScript section of the Test Suite, as shown below.

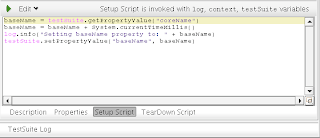 Within the Setup script, you have access to certain variables including log, context, and testSuite. These variables give you access to the SoapUI framework to enable logging and access to test steps, properties, etc. As you can see above, the script retrieves the "coreName" property from the Test Suite properties, appends the current time in millis, and then sets the value of the "baseName" property. This baseName property is used in the creation of usernames and email addresses in numerous Test Cases and assertions throughout the Test Suite. The green arrow at the top left of the script editor window allows you test the script.
Test Steps
SOAP Test Step
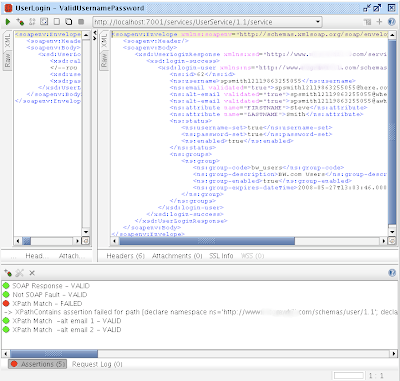
As mentioned earlier, we used 3 different types of test steps throughout our Test Suite. Given we are testing web services, the most used test step type is the SOAP test step. A screen shot of the SOAP Test Step screen is shown below.
There are several areas of interest on this screen. The top area has a number of buttons for creating assertions, default requests based off the WSDL, executing the test steps, etc. There is also a drop down that allows you to define what endpoint to which to send the request. This gets pre-populated based on the WSDL.
The left-middle pane of the window shows the request payload for the SOAP request. You can see that there are some property placeholders being used in this request. When using Test Suite scoped properties, the format is: "${#TestSuite#<property-name>}". So you can see here that we are attempting to call the UserLogin operation, passing in the username property as the username and password request parameters.
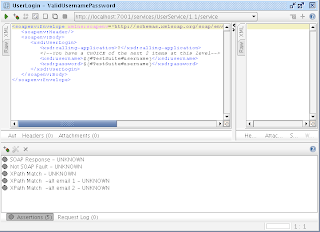
The bottom portion of the window shows the assertions that we have defined for this test case. As with other testing frameworks, if the assertion fails, the test step fails. How this failure is handled by SoapUI is defined in the Test Step options. These can be accessed via right-clicking on the Test Step in the left hand pane of the SoapUI window. The option window is shown below.
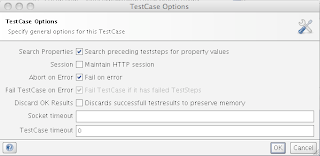 As you can see, I have my test cases failing on error and aborting on error. Typically in my scenario, if one step failed, the following steps would usually fail, so I let the entire test case abort.
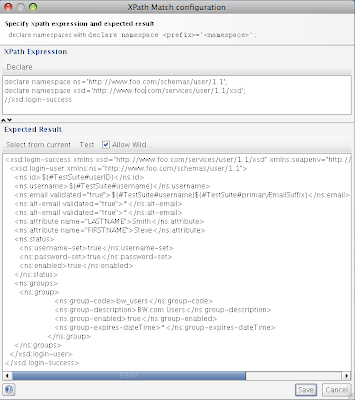
SoapUI supports a number of assertion types. The ones we typically used were SOAP response, ensuring no SOAP faults, and XPath expressions. There are many ways to define assertions and each developer has there own technique, but we have learned a lesson or two along the way. Initially we started out by using XPath to validate each of the return elements in the Response payload. So we would have an XPath expression that would extract a particular node of the response and we would test for a certain value. The XPath configuration window is shown below:
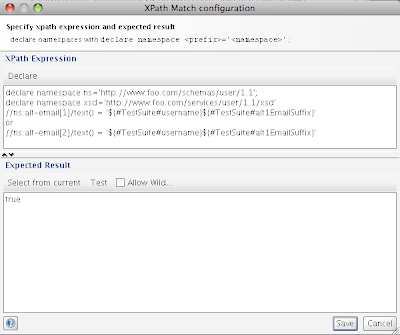
Here we can see that the top portion defines the XPath expression to execute against the response. In the top portion of the window, we declare any namespaces and define our XPath expression. In the bottom portion of the window, the expected result is entered. There are two actions that can be performed in this window against the XPath expression. The first is "Select from Current". This will execute the XPath expression against the response (this means that the request needs to be submitted), and place the result in the expected result window. This is handy to validate your XPath expression, not to mention having the expected result filled in for you. The next action that can be performed is the "Test" action. This will test the XPath expression against the expected result and assert whether they match. If they do not match, the difference will be indicated.
In the assertion above, we are looking at the alt-email node in the response. We know that there are 2 alt-emails for this user (since we registered the user in an earlier test case). The interesting thing here is that we do not know which alt-email will be returned first in the response payload. There is no real way to distinguish between the nodes. Therefore, we put in an "or" and specify that the first or second alt-email matched the pre-defined Test Suite property "${#TestSuite#username}${#TestSuite#alt1EmailSuffix}". The expected result of this XPath expression is "true". We also defined another assertion, comparing the alt-email nodes with the second alt-email Test Suite property. This way we are ensuring that both alt-email addresses come back in the response payload for this operation. Another example of an XPath expression would be looking for a specific value in the response payload, as shown below:
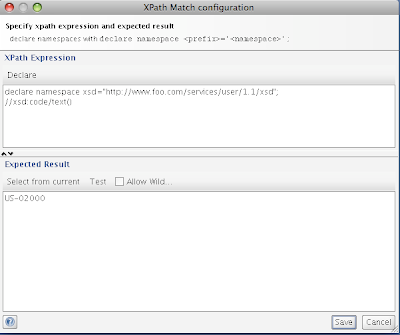
One more intersting option on the assertion window is the "Allow Wildcards" checkbox. If we do not care about specific values being returned in the response, we can replace those values with an asterisk, and the assertion will pass regardless of what is contained there. This can be seen below:
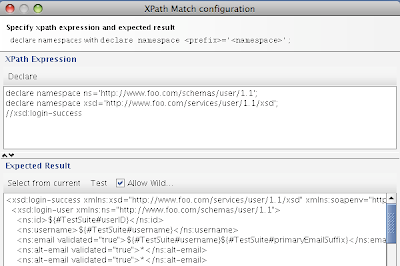
Here, we don't care about the actual alt-email addresses coming back, we just care that there are two of them and they both have a validated attribute of "true".
One lesson learned here was that it was easy to get lazy and have our XPath expression select the entire response payload and then replace the dynamic fields in the expected reponse with the Test Suite property placeholders. This made the test step development quicker and easier, but if the schema changed, we had to go through all the effected responses and reformat them. Now this would have been the case had we validated each node independently in the response, but the impact of the changes would be more focused and easier to manage.
Property Transfer Steps
Property Transfer steps allow you to extract a value from a source (SOAP request/response payload, another property, etc.) and place it into a target (SOAP request/response payload, another property, etc.). We used these to pull values from SOAP responses and place them into properties that could be used in subsequent Test Steps.
In our scenario, we had requirements that allowed a consuming application to request a login token that could be used in a "remember me" capacity. Thereby allowing an application to log the user in by using the token in place of username/password credentials. So we needed a test step to test the create token operation, then store that token for testing a subsequent login operation. This was accomplished using the Property Transfer step that retrieved the token from the response payload of the CreateToken test step and stored it in a property called "loginToken". The configuration for that step is shown below:
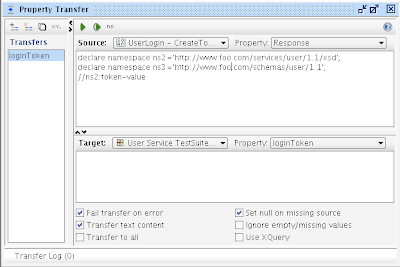 As you can see, we extract the response value using an XPath expression and define the target as the defined Test Suite property "loginToken". This window allows multiple property transfer definitions and also allows the testing of the transfer by clicking the green arrow button at the top of the window. The source drop down allows you to select any test step defined in this test case, and the target drop down allows the same. This is one area where the order of your test steps can come into play. The response where we are extracting the token-value from is executed before this test step. The step that requires this token is following the property transfer test step.
Groovy Script Test Steps
In the test case described above, we requested a token in one test step, used a property transfer step to store the response, and then performed a login using the token in another test step. An additional requirement stated that if the token has expired, the login should fail. Since the token expiration can only be set to be some future time, we needed a way to manipulate the underlying data. We used a Groovy Script Step to access the database and update the expiration time of the token to some time in the past. The code is shown below:
This test step sets the expiration of the token to some time in the past, so the following test step can validate that attempting to login with an expired token will fail.
Another way in which we used Groovy Scripts was to clean up the data we created and manipulated during our test execution. This script uses property values defined in previous steps to delete the appropriate records from the database. This is the final test step executed in this Test Suite.
Putting it All Together
After going through and implementing all the SOAP Steps, Property Transfer Steps, Groovy Steps, etc. we finally have a Test Suite. Here is a portion of what the Test Suite looks like (due to size, I couldn't fit it all).
 If we execute the Test Suite by clicking the green arrow at the top of the window, we can see the results. Here is a portion of the results from my last run:

You can see that some test cases passed and some failed. Since some failed, the entire suite failed. In order to determine what failed, you can double-click on the Test Case and it will bring up the test case editor.
 We see here that the 5th test step failed, and we can drill into that by double clicking on it.
 Here, we can see that the 3rd assertion failed, lets take a look at what the problem was. You can see a description just below the assertion indicating what failed. The message below is what you would read if you could see the entire string.
XPathContains assertion failed for path [declare namespace ns='http://www.foo.com/schemas/user/1.1';
declare namespace xsd='http://www.foo.com/services/user/1.1/xsd';
//xsd:login-success] : Exception:org.custommonkey.xmlunit.Diff
[different] Expected attribute value 'LASTNAME' but was 'FIRSTNAME' - comparing at /login-success[1]/login-user[1]/attribute[1]/@name to at /login-success[1]/login-user[1]/attribute[1]/@name
This says that the reponse expected a node with the attribute value of "LASTNAME", but actually received "FIRSTNAME". If we look at the details of our assertion, we see that the laziness I mentioned earlier came back to haunt us.
 The basic problem is that there are multiple "attribute" nodes for a given user. These attribute nodes have a "name" attribute that defines the attribute. Since we are asserting the entire response payload, and these attributes can come back in any order, there is no guarantee that the response payload will match our assertion. The proper way to validate this test step would be to create an assertion for each node to ensure the response payload contains everything we expect.
Eventually after cleaning up all the test cases, we can get a test suite that executes cleanly. Also, SoapUI provides a command line interface and maven plugins, so that these tests can integrated into your build environments as well.
Summary
SoapUI provides a robust set of capabilities to test web services not only during development, but also to test the validity of deployments. As with good testing practices, it does require upfront planning and good test case definition.
Not only were we able to test the functionality of our web services during development, but we were able to deploy and validate new versions of our service in a manner of minutes. This was a great time saver and allowed us to confidently declare our web services as available to consumers.


The Service and How Should We Test It?
The service that we were developing was one needed for basic authentication and user profile management. The data was stored in an Oracle database and there were requirements supplied from the business regarding data validation rules and business logic. Very standard stuff. Once the WSDL and database designs were completed, we discussed the best way to test our service once implementation began. We started developing test cases with JUnit and subsequently testing our deployments with SoapUI. After a very short period of time (and a better understanding of the capabilities of SoapUI), we realized that we were starting to duplicate our testing logic between the two frameworks. After some more consideration, it became apparent that through the creation of SoapUI Test Cases and Test Suites, we could perform the same level of testing as we could writing JUnit tests. The additional benefit that we got by using SoapUI was that we could validate deployments in various environments very quickly and easily. This allowed us to confidently notify service consumers that deployments were available and ready for consumption.
System Requirements
The requirements for using SoapUI for testing this kind of service are quite simple. First, you need SoapUI (obviously). For our needs, the open source version was more than capable. You need a service to test. Our service was deployed to Weblogic, and I have it running locally. If you intend for your Test Suite to clean the database up after your test run completes, you will need the appropriate JDBC driver. The driver needs to be placed in the <soapui-home>
Test Suite Overview
Our service was comprised of about 20 different service operations, some of which write to the database, and all of them read from the database. A test case was developed for each service operation, and the test steps within each test case were developed based off the requirements of the operation. Since the purpose of the service is User Profile management, we needed to define a number of attributes that could be reused across the test cases for testing and assertions. For example, our service has one operation for registering a user and another for getting a users profile data. So the data used for the registration test cases can be used subsequently to validate the return from the get user operation. Also, at the end of the test run, we want to clean up any data that was created and used for the test, so we needed to keep track of users created, etc.
So, the next few sections will describe how to go about creating the Test Suite, defining and using Properties, and provide examples of different Test Steps and how they were developed.
Creating the Test Suite

You will be prompted to select the operations to include in the Test Suite, along with some options for how you want the Test Suite constructed. Using "One TestCase for each Operation" provides a good modular approach to developing your Test Suite, and it also makes reuse and Load Tests easier. If you have been using SoapUI to exercise the web service and have existing requests defined in the Service Interface, you can choose to reuse those requests or you can have SoapUI generate empty requests.
An alternative way to create a Test Suite would be to right-click on the project and select "New TestSuite". You will be prompted for a name and an empty Test Suite will be created. Test Cases can be added by right-clicking on the TestSuite and selecting "New TestCase".
Then within each Test Case, you can define one or more Test Steps. These represent the actual test code that gets executed. Shown below is a screen shot of the RegisterUser Test Case.
 As you can see, there are 15 test steps. These map to the requirements that we were implementing against. They are executed in the order shown, and their order can be changed by right-clicking on a Test Step and selecting either Move Up or Move Down.
SoapUI supports numerous types of test steps including: SOAP, Groovy, Property Transfer, Property Steps, Conditional Gotos, and Delays. In our project we used SOAP steps, Property Transfer steps and Groovy Script steps. More details on the various Test Steps we used and how we used them can be found later in this post.
Defining Test Properties
As mentioned earlier, we need to define a number of properties that can be reused across test cases and assertions. These properties are defined at the Test Suite level.
Once we have a Test Suite, we can define properties that can be shared and reused across Test Cases within the Test Suite. If you open the Test Suite editor by double-clicking on the Test Suite in the left hand pane, you will see the following:


This approach worked pretty well, except that we realized that if developers were executing the test suite concurrently we could have data collisions. Especially with attributes like username and email address, which are unique across the system. So we needed a way to provide some level of uniqueness during the life of a test execution. We did this via the "Setup Script" option for the Test Suite. SoapUI will execute the Setup Script upon each Test Suite execution. It will also execute the TearDown Script upon completion of the test run.These Setup and Teardown scripts are Groovy based scripts . So, we wrote a little script to append the current time in millis onto some property (called "coreName") and placed that in the SetupScript section of the Test Suite, as shown below.
 Within the Setup script, you have access to certain variables including log, context, and testSuite. These variables give you access to the SoapUI framework to enable logging and access to test steps, properties, etc. As you can see above, the script retrieves the "coreName" property from the Test Suite properties, appends the current time in millis, and then sets the value of the "baseName" property. This baseName property is used in the creation of usernames and email addresses in numerous Test Cases and assertions throughout the Test Suite. The green arrow at the top left of the script editor window allows you test the script.
Test Steps
SOAP Test Step
As mentioned earlier, we used 3 different types of test steps throughout our Test Suite. Given we are testing web services, the most used test step type is the SOAP test step. A screen shot of the SOAP Test Step screen is shown below.

There are several areas of interest on this screen. The top area has a number of buttons for creating assertions, default requests based off the WSDL, executing the test steps, etc. There is also a drop down that allows you to define what endpoint to which to send the request. This gets pre-populated based on the WSDL.
The left-middle pane of the window shows the request payload for the SOAP request. You can see that there are some property placeholders being used in this request. When using Test Suite scoped properties, the format is: "${#TestSuite#<property-name>}". So you can see here that we are attempting to call the UserLogin operation, passing in the username property as the username and password request parameters.
The bottom portion of the window shows the assertions that we have defined for this test case. As with other testing frameworks, if the assertion fails, the test step fails. How this failure is handled by SoapUI is defined in the Test Step options. These can be accessed via right-clicking on the Test Step in the left hand pane of the SoapUI window. The option window is shown below.
 As you can see, I have my test cases failing on error and aborting on error. Typically in my scenario, if one step failed, the following steps would usually fail, so I let the entire test case abort.
In the assertion above, we are looking at the alt-email node in the response. We know that there are 2 alt-emails for this user (since we registered the user in an earlier test case). The interesting thing here is that we do not know which alt-email will be returned first in the response payload. There is no real way to distinguish between the nodes. Therefore, we put in an "or" and specify that the first or second alt-email matched the pre-defined Test Suite property "${#TestSuite#username}${#TestSuite#alt1EmailSuffix}". The expected result of this XPath expression is "true". We also defined another assertion, comparing the alt-email nodes with the second alt-email Test Suite property. This way we are ensuring that both alt-email addresses come back in the response payload for this operation. Another example of an XPath expression would be looking for a specific value in the response payload, as shown below:

One more intersting option on the assertion window is the "Allow Wildcards" checkbox. If we do not care about specific values being returned in the response, we can replace those values with an asterisk, and the assertion will pass regardless of what is contained there. This can be seen below:

One lesson learned here was that it was easy to get lazy and have our XPath expression select the entire response payload and then replace the dynamic fields in the expected reponse with the Test Suite property placeholders. This made the test step development quicker and easier, but if the schema changed, we had to go through all the effected responses and reformat them. Now this would have been the case had we validated each node independently in the response, but the impact of the changes would be more focused and easier to manage.
Property Transfer Steps
Property Transfer steps allow you to extract a value from a source (SOAP request/response payload, another property, etc.) and place it into a target (SOAP request/response payload, another property, etc.). We used these to pull values from SOAP responses and place them into properties that could be used in subsequent Test Steps.
In our scenario, we had requirements that allowed a consuming application to request a login token that could be used in a "remember me" capacity. Thereby allowing an application to log the user in by using the token in place of username/password credentials. So we needed a test step to test the create token operation, then store that token for testing a subsequent login operation. This was accomplished using the Property Transfer step that retrieved the token from the response payload of the CreateToken test step and stored it in a property called "loginToken". The configuration for that step is shown below:
 As you can see, we extract the response value using an XPath expression and define the target as the defined Test Suite property "loginToken". This window allows multiple property transfer definitions and also allows the testing of the transfer by clicking the green arrow button at the top of the window. The source drop down allows you to select any test step defined in this test case, and the target drop down allows the same. This is one area where the order of your test steps can come into play. The response where we are extracting the token-value from is executed before this test step. The step that requires this token is following the property transfer test step.
Groovy Script Test Steps
In the test case described above, we requested a token in one test step, used a property transfer step to store the response, and then performed a login using the token in another test step. An additional requirement stated that if the token has expired, the login should fail. Since the token expiration can only be set to be some future time, we needed a way to manipulate the underlying data. We used a Groovy Script Step to access the database and update the expiration time of the token to some time in the past. The code is shown below:
As you can see in the code above, we are accessing both Test Suite scoped properties as well as properties defined in another test case. We decided to define our database connection properties in a separate test case/test step. This was done to make it easier to manage the connection properties for multiple environments. We could simply define a property test step for each environment, and by simply renaming the test step to the standard "ConnectionProperties" test step name, the appropriate connection properties would be used across the test suite. Also, the loginToken property that was defined and used in a previous test steps, is being reused again. This is where defining properties comes in handy.
import java.sql.Connection;
import java.sql.DriverManager;
import java.sql.ResultSet;
import java.sql.SQLException;
import java.sql.Statement;
import com.eviware.soapui.SoapUI;
import com.eviware.soapui.model.testsuite.*;

def Connection con = null;
def Statement stmt = null;
def ResultSet rs = null;
try{
def tokenValue = testRunner.getTestCase().getTestSuite().getPropertyValue("loginToken");

def propertyStep = testRunner.getTestCase().getTestSuite().getTestCaseByName("ConnectionProperties").getTestStepByName("ConnectionProperties")
def dbDriver = propertyStep.getPropertyValue("dbDriver");
def dbConnString = propertyStep.getPropertyValue("dbConnString");
def dbHostName = propertyStep.getPropertyValue("dbHostName");
def dbHostPort = propertyStep.getPropertyValue("dbHostPort");
def dbServiceName = propertyStep.getPropertyValue("dbServiceName");
def dbConnection = dbConnString + dbHostName + ":" + dbHostPort + ":" + dbServiceName
def dbUsername = propertyStep.getPropertyValue("dbUsername");
def dbPassword = propertyStep.getPropertyValue("dbPassword");

log.info("Connecting to " + dbConnection);
Class.forName(dbDriver);
con = DriverManager.getConnection(dbConnection, dbUsername, dbPassword);
stmt = con.createStatement();
def sql = "update token set expire_date = to_date('2007-01-01 12:00:00 AM', 'YYYY-MM-DD HH:MI:SS AM') where token_value='" + tokenValue + "'"
count = stmt.executeUpdate(sql)
log.info("statement = " + sql)
log.info("updated " + count + " rows in token table")
}catch(SQLException e){
log.info(e.getMessage());
}catch(ClassNotFoundException e){
e.printStackTrace();
}finally{
try{rs.close();}catch(Exception e){}
try{stmt.close();}catch(Exception e){}
try{con.close();}catch(Exception e){}

}
This test step sets the expiration of the token to some time in the past, so the following test step can validate that attempting to login with an expired token will fail.
Another way in which we used Groovy Scripts was to clean up the data we created and manipulated during our test execution. This script uses property values defined in previous steps to delete the appropriate records from the database. This is the final test step executed in this Test Suite.
Putting it All Together
After going through and implementing all the SOAP Steps, Property Transfer Steps, Groovy Steps, etc. we finally have a Test Suite. Here is a portion of what the Test Suite looks like (due to size, I couldn't fit it all).
 If we execute the Test Suite by clicking the green arrow at the top of the window, we can see the results. Here is a portion of the results from my last run:
You can see that some test cases passed and some failed. Since some failed, the entire suite failed. In order to determine what failed, you can double-click on the Test Case and it will bring up the test case editor.
 We see here that the 5th test step failed, and we can drill into that by double clicking on it.
 Here, we can see that the 3rd assertion failed, lets take a look at what the problem was. You can see a description just below the assertion indicating what failed. The message below is what you would read if you could see the entire string.
XPathContains assertion failed for path [declare namespace ns='http://www.foo.com/schemas/user/1.1';
declare namespace xsd='http://www.foo.com/services/user/1.1/xsd';
//xsd:login-success] : Exception:org.custommonkey.xmlunit.Diff
[different] Expected attribute value 'LASTNAME' but was 'FIRSTNAME' - comparing
This says that the reponse expected a node with the attribute value of "LASTNAME", but actually received "FIRSTNAME". If we look at the details of our assertion, we see that the laziness I mentioned earlier came back to haunt us.
 The basic problem is that there are multiple "attribute" nodes for a given user. These attribute nodes have a "name" attribute that defines the attribute. Since we are asserting the entire response payload, and these attributes can come back in any order, there is no guarantee that the response payload will match our assertion. The proper way to validate this test step would be to create an assertion for each node to ensure the response payload contains everything we expect.
Eventually after cleaning up all the test cases, we can get a test suite that executes cleanly. Also, SoapUI provides a command line interface and maven plugins, so that these tests can integrated into your build environments as well.
Summary
SoapUI provides a robust set of capabilities to test web services not only during development, but also to test the validity of deployments. As with good testing practices, it does require upfront planning and good test case definition.
Not only were we able to test the functionality of our web services during development, but we were able to deploy and validate new versions of our service in a manner of minutes. This was a great time saver and allowed us to confidently declare our web services as available to consumers.
Thursday, May 17, 2007
BPEL Correlations...as easy as it sounds?
In my previous post I discussed the basics of BPEL correlations. In this post, I want to present the challenge I faced trying to apply correlations to my business process, which unfortunately for me does not align with any vendor tutorials I have seen. Imagine that :)
The portion of my business process which requires correlation involves calling out to a notification web service and supplying an unbounded set of people to which I want to notify. This notification web service then responds with a single notification identifier (notification ID) representing the notification sent. At some future point in time, the people notified will respond (or the notification system will let me know there was no response). These responses can be received in any order at any time, and are received via a web service call into my ESB. The payload of this web service call includes the notification ID and the response of the person. After receiving the response, my business process updates the person information with the response and continues on. This is exactly what correlations are made for. Perfect!
Challenge 1: If I define correlation initialization on the notification web service invocation activity, this will persist 1 instance of the business process. But I have multiple responses coming back. After the first response is received, I have no business process instances waiting.
Solution 1a: I'll just loop around the web service invocation for each person in my set of people and make individual calls out to the notification web service. This will create multiple notification IDs and therefore persist multiple business process instances. So as responses come back, each one will correspond to its own instance. The business process would look something like this:
 Problems: First, the business process will always run to completion as the response web service implementation gets invoked after the while loop (i.e. there is no receive task for the process to wait on). So, if we replace the web service implementation with a JMS receive task we can get over that hurdle. All we have to do is create another business process that implements a web service, and within the implementation it uses a JMS send activity to send the notification response to the corresponding JMS queue that this process is monitoring. The new business processes look like this:

 Now the problem is that we really only have one business process instance being created. Although it seems like multiple business process instances are being persisted, each one really maps to the same instance. So, once the 1st response is received, the persisted instance is gone and other responses are left hanging.
Solution 1b: So, we remove the loop here and will need to create another business process (we are now up to 3 business processes) that sends messages with a single person to the inbound JMS queue. This will cause a new business process instance to be created for each person, so each response can now be correlated to one of these instances.
Challenge 2: How do we define the correlation set so that it actually works? Our correlation aliases were initially defined as the notification ID returning from the notification web service invocation and the JMS receive message text. Since the message text value (an XML message) does not match the notification ID (an int data type), the correlation is not working.
Solution: This was a difficult one. I went through many iterations with problems....err challenges encountered with each one. Here they are:
(1) Add an unmarshal task so that we can correlate on the resulting notification ID value. This will require using correlation on the Unmarshal activity. Since the JMS receive activity, which occurs prior to the unmarshal, causes the BPEL engine to retrieve an instance from persistence, and no correlation set is defined for this task, the engine grabs any instance. So essentially there is no real correlation going on.
(2) Try using the JMS message header correlation ID. This involved mapping the response notification ID to the correlation ID of the JMS message header prior to placing this on the response queue (in our second business process). The issue here was the correlation ID message property is defined as a string, while the notification ID is an int. So CAPS will not let you define an appropriate correlation key/correlation set that will work. The data types of each alias need to be the same, which makes sense. Also, since my business process has 2 JMS receive tasks, the BPEL engine gets confused when trying to create the instance identifier using the correlation ID of the JMS message header.
(3) Call for help. I discussed this problem with someone I know from Sun and he was able to provide a pre-release of some documentation that provided a good amount of insight into how to deal with correlations. The result of this new found knowledge was the creation of one more business process (for a total of 4) that actually had 2 JMS receive tasks. I could then create a correlation set based on the JMS message header correlationID and use correlations on each of the JMS receive tasks. The following images show 3 of the 4 business processes (the one not shown is simply a loop that places messages on the inbound JMS queue for the notification web service invocation process).
 Notification Response Web Service Implementation
Combined Business Process Using Correlation

First, a message is placed on the inbound queue of the notification web service invocation process. This calls the external web service and uses the response to place a message on the correlation.queue JMS queue. Also, the notification ID that is the response from the web service invocation is set to the JMS message header correlationID property.
Recall that the Combined Business Process has a correlation set defined to be the correlationID message header property. The 2 JMS receive activities are set to use correlations. The first receive task initializes it and the second uses it.
So, once the first message is received, an instance of the Combine Business Process is created and then persisted (since it is now waiting on the second JMS receive). Now, at some future point in time, a person responds to the notification (or the service responds with "no response"). The response includes the notification ID and the response. The Notification Response Web Service Implementation maps the notification ID to the correlationID message property and places the response on the response.queue.
The second JMS receive task on the Combined Business Process is using this queue. This causes the BPEL engine to retrieve the business process instance that corresponds to the notification ID contained within the persons response. The process instance is retrieved (along with its state), and the business process continues to completion. This implementation of correlation finally worked.
From initial design to final implementation took longer (and was more painful) than it sounds. As a result I got a great understanding of how correlation works within CAPS and I am confident that this knowledge will transfer to other products as well.
The portion of my business process which requires correlation involves calling out to a notification web service and supplying an unbounded set of people to which I want to notify. This notification web service then responds with a single notification identifier (notification ID) representing the notification sent. At some future point in time, the people notified will respond (or the notification system will let me know there was no response). These responses can be received in any order at any time, and are received via a web service call into my ESB. The payload of this web service call includes the notification ID and the response of the person. After receiving the response, my business process updates the person information with the response and continues on. This is exactly what correlations are made for. Perfect!
Challenge 1: If I define correlation initialization on the notification web service invocation activity, this will persist 1 instance of the business process. But I have multiple responses coming back. After the first response is received, I have no business process instances waiting.
Solution 1a: I'll just loop around the web service invocation for each person in my set of people and make individual calls out to the notification web service. This will create multiple notification IDs and therefore persist multiple business process instances. So as responses come back, each one will correspond to its own instance. The business process would look something like this:
 Problems: First, the business process will always run to completion as the response web service implementation gets invoked after the while loop (i.e. there is no receive task for the process to wait on). So, if we replace the web service implementation with a JMS receive task we can get over that hurdle. All we have to do is create another business process that implements a web service, and within the implementation it uses a JMS send activity to send the notification response to the corresponding JMS queue that this process is monitoring. The new business processes look like this:
 Now the problem is that we really only have one business process instance being created. Although it seems like multiple business process instances are being persisted, each one really maps to the same instance. So, once the 1st response is received, the persisted instance is gone and other responses are left hanging.
Solution 1b: So, we remove the loop here and will need to create another business process (we are now up to 3 business processes) that sends messages with a single person to the inbound JMS queue. This will cause a new business process instance to be created for each person, so each response can now be correlated to one of these instances.
Challenge 2: How do we define the correlation set so that it actually works? Our correlation aliases were initially defined as the notification ID returning from the notification web service invocation and the JMS receive message text. Since the message text value (an XML message) does not match the notification ID (an int data type), the correlation is not working.
Solution: This was a difficult one. I went through many iterations with problems....err challenges encountered with each one. Here they are:
(1) Add an unmarshal task so that we can correlate on the resulting notification ID value. This will require using correlation on the Unmarshal activity. Since the JMS receive activity, which occurs prior to the unmarshal, causes the BPEL engine to retrieve an instance from persistence, and no correlation set is defined for this task, the engine grabs any instance. So essentially there is no real correlation going on.
(2) Try using the JMS message header correlation ID. This involved mapping the response notification ID to the correlation ID of the JMS message header prior to placing this on the response queue (in our second business process). The issue here was the correlation ID message property is defined as a string, while the notification ID is an int. So CAPS will not let you define an appropriate correlation key/correlation set that will work. The data types of each alias need to be the same, which makes sense. Also, since my business process has 2 JMS receive tasks, the BPEL engine gets confused when trying to create the instance identifier using the correlation ID of the JMS message header.
(3) Call for help. I discussed this problem with someone I know from Sun and he was able to provide a pre-release of some documentation that provided a good amount of insight into how to deal with correlations. The result of this new found knowledge was the creation of one more business process (for a total of 4) that actually had 2 JMS receive tasks. I could then create a correlation set based on the JMS message header correlationID and use correlations on each of the JMS receive tasks. The following images show 3 of the 4 business processes (the one not shown is simply a loop that places messages on the inbound JMS queue for the notification web service invocation process).
Notification Web Service Invocation
 Notification Response Web Service ImplementationCombined Business Process Using Correlation
First, a message is placed on the inbound queue of the notification web service invocation process. This calls the external web service and uses the response to place a message on the correlation.queue JMS queue. Also, the notification ID that is the response from the web service invocation is set to the JMS message header correlationID property.
Recall that the Combined Business Process has a correlation set defined to be the correlationID message header property. The 2 JMS receive activities are set to use correlations. The first receive task initializes it and the second uses it.
So, once the first message is received, an instance of the Combine Business Process is created and then persisted (since it is now waiting on the second JMS receive). Now, at some future point in time, a person responds to the notification (or the service responds with "no response"). The response includes the notification ID and the response. The Notification Response Web Service Implementation maps the notification ID to the correlationID message property and places the response on the response.queue.
The second JMS receive task on the Combined Business Process is using this queue. This causes the BPEL engine to retrieve the business process instance that corresponds to the notification ID contained within the persons response. The process instance is retrieved (along with its state), and the business process continues to completion. This implementation of correlation finally worked.
From initial design to final implementation took longer (and was more painful) than it sounds. As a result I got a great understanding of how correlation works within CAPS and I am confident that this knowledge will transfer to other products as well.
Subscribe to:
Posts (Atom)


